Its been a little while since I did my last post so I thought I would give an update. Its been almost impossible to get much of anything done on the Shasta with the new little one. He has been a bit of a handful. However, we think we might have that under control (is there some wood around here that I can knock on). I did get a chance to start my curtains. Unfortunately, I didn't take any pics but they are coming out great. For those of you out there that are thinking of doing you own curtains, its not hard but it is VERY time consuming to do it right. I have them all made for the dinette area and the one for the bathroom is done. This took about 10 hours and is less than half of the camper.
There has also been some progress on wings. I have made a set of early wings for a Shasta friend of mine on the west coast. This gave me some experience to make sets for sale and I am half way through a set for '59. They are looking great.... again finding time is rough. Also thanks to some work from Peppere B the rollers for the later years (including mine) are just about done and the work fantastic! makes the bead lines in the wings and really looks original.
The camping season is coming so I need to get crackilackin. Here is what is left:
- Battery Box and wire Battery
- Cable lines
- Fix bad solder joint on exterior lights
- Fix and mount screen door
- 2 more window screens to make
- Mount cabin dome light (just got it in)
- Install side front window which I recently BROKE!
- Finish trim for dinette windows (80% done)
- Interior shelving
- matress for the bunk
- shower head
- shower curtain
- exterior TV mount
- WINGS!
- REGISTRATION and INSPECTION!
Its mostly small stuff but it adds up into quite a bit of work and that means time... anybody have some I can buy? ... No... Didnt think so.

Your Place for the Best Shasta Reproduction Wings Anywhere, and Shasta Restoration Knowledge!!!
Thursday, February 23, 2012


Monday, December 19, 2011
Dinette is DONE
It's been a while since I have had a chance to post. Lets say its been a busy month with the birth of my second son Jacoby. Another happy camper joins our ranks... lets hope he stays happy. On top of that, a car accident, a leaking roof, and a Thomas themed extravaganza for my 2 year old. Even during this busy time I was able to sqeeze in a little work. With a little help from my in-laws, I finally I got the dinette cushions recovered. I have had this material for about a year! I went full on with sewn corners and the whole deal. I posted the rebuild of the frames in a previous post if you are interested in seeing that. The rubber hallway runner from home depot worked great!. I used hog rings to hold it on top of the springs and then a layer of foam on top of that. The rubber really helps to distibute the load of you butt! Very comfortable.


I was trying to go for a modern take on a Retro look with the material... I have no idea if I succeeded in this but I do think it looks fantastic. It was about 20 degrees in the barn when I put these in last night. Peppere B, being a bit of a veteran in this kind of stuff, was checking out my first attempt at upholstery work. His rump seemed to think I did well.


The scrabble table is ready. I am looking at you Derek and Julie!
Monday, October 24, 2011
Getting Closer to the Finish Line
Well I made some great progress again this weekend. Whenever I think I am almost done I fine yet another item that needs to be checked off of the list. This weekend some big items got the DONE stamp. First the bumper. She is in, painted and I have incorporated some very cool stabilizers. I get this idea from Jen's (my wife) uncle Dick he did something similar on his Airstream, Thanks Dickie! Looks like its going to work well. Have a look. You just drop the two pipes down the welded on tubes, tighten the pinch bolt, and crank the front up. DONE


Also all of the trim for the windows is made and urethaned. Ready to be installed. Looking forward to getting that done. The trim alone took a whole weekend to cut to size and make. Tedious crap.
Finally the Dinnette cushions... OHHH the disgustingness of it all. The mouse urine was thick that day my friends. I think these photos show some of the damage. I tried to salvage the frame. I found the best way to get mouse pee out is to burn the piece of wood that has pee soaked in it and make new frames from scratch. They are done and I am very happy with the results.


OHHH but thats not all. I also made new screens for all of my windows. They sell all the stuff at Home Depot. Its not very costly and once you get the hang if it... its pretty easy. They look like they might be original to the camper, very happy with the final product.


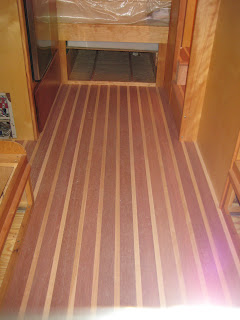
The Floor is also all done... think I might have shown this on some previous posts but oh well. Here it is.


This is what it looks like with the pipes out.
Also all of the trim for the windows is made and urethaned. Ready to be installed. Looking forward to getting that done. The trim alone took a whole weekend to cut to size and make. Tedious crap.
Finally the Dinnette cushions... OHHH the disgustingness of it all. The mouse urine was thick that day my friends. I think these photos show some of the damage. I tried to salvage the frame. I found the best way to get mouse pee out is to burn the piece of wood that has pee soaked in it and make new frames from scratch. They are done and I am very happy with the results.


New frame next to old frame. The black marks are the stains from the mice... my whole garage stunk


I used rubber hallway runner as the backer for the springs instead of burlap. its cheap and I think it will work great. I was able to reuse the upper frames as they had not been invaded by rodents.
OHHH but thats not all. I also made new screens for all of my windows. They sell all the stuff at Home Depot. Its not very costly and once you get the hang if it... its pretty easy. They look like they might be original to the camper, very happy with the final product.

I also restored the original dealers metal cast name plate. Shasta owners like to keep and show these on their trailers as they originally were, its kinda a thing. Pretty cool, tells you where the camper originally came from.... not too interesting for me in this case, it came from 40 minutes away from where I bought it. I was hoping for Albacurky, or Kalimazoo.... anywhere more interesting and perhaps where Bugs Bunny might have frequented.

The Floor is also all done... think I might have shown this on some previous posts but oh well. Here it is.


Tuesday, October 11, 2011
The Barn
In a previous post I promised to add some pictures of the barn that I am working on the Shasta in. Well today I received some good pictures from my favorite (and only) sister-in-law. Thanks Jess. Enjoy... and to my fellow Shasta restorers, try not to be too jealous.


The first floor has 12 ft ceilings... you could fit 4 Campers....... hmmmmmm

The sister-in-law and I upstairs in the wood shop. These are the old woodworking tools from my grandfather who build wooden boats. The machines are 40's and 50's vintage, great stuff, all cast iron.

The assembly table and work area. Most of the items I made for the trailer were done up here and then carried down stairs for assembly

They didn't care much about safety back then. Nothing has guards... nice exposed belts to get your hand caught in.

Work bend
The whole barn was made by my father, it even has some homemade lumber in it. He has a home built sawmill next to the barn. The Shasta has some of that wood in it as well.
Saturday, October 8, 2011
Wings, Progress, and What-not
I am going to start off this post by talking a bit about the Vintage Shasta Trailer Forum http://vintageshasta.proboards.com/index.cgi . If your restoring or renovating a camper, this is a fantastic resourse. I will be adding a link to the site on my blog. The administrator Brian does a great job with it. I have been posting quite a bit lately on the forum about the Shasta wings. I need to make the set for my camper, and I know there are so many people out there that need wings for their trailers as well. This got me to thinking if I can duplicate the factory wings... and do it well, I can offer these to others. Well the respose was quite good. I have some generous folks who are willing to donate damaged wings so that templates can be made. I am looking forward to getting this going... should keep me busy this winter. That and my second child which is due in November.
So now to the progress on rhw Nasty Shasty. Sorry to say I dont have any pictures to post this week. However there has been a ton of progress. The floors are finished with three coats of poly and look fantastic. Really happy with how these came out. Also the drawer under the bed is done, just two coats left on that. The bathroom door is complete. I used an old latch that I found in the barn for it. Looks great and was my grandfathers, I love that. The decals are on! Like adding a cherry to the sunday. Oh and how could I forget... got the toilet in today.... like the pit of the cherry!
The wife and I went antiquing the other day to find decor items for the interior. We found some awesome items. Old tin signs, a 50's coke bottle rack (that I plan on converting into shelves). Some really great stuff.
Also went with mom to pick out curtain material. Needed a ladies touch for this. We found some great green material for the curtains that I think is going to really match well.
So how does the TO-DO list look:
First the good news:
COMPLETED!!
Decals
Install Dimmer for exterior lights
Poly Floor..three coats
build drawer for under the bed
install all pulls and handles on cabinets
Install toilet and plumb
Plumb LP for hot water heater
STILL TO DO
Restore and recover dinette cushions.
New bumper
Build new wings
Mount wings
Make and install trim for all windows inside
Make curtains and mount rods
Shower curtain and head
Interior decore items
matress for the bunk
Run cable tv connection
Battery and Battery Box
Registration
So now to the progress on rhw Nasty Shasty. Sorry to say I dont have any pictures to post this week. However there has been a ton of progress. The floors are finished with three coats of poly and look fantastic. Really happy with how these came out. Also the drawer under the bed is done, just two coats left on that. The bathroom door is complete. I used an old latch that I found in the barn for it. Looks great and was my grandfathers, I love that. The decals are on! Like adding a cherry to the sunday. Oh and how could I forget... got the toilet in today.... like the pit of the cherry!
The wife and I went antiquing the other day to find decor items for the interior. We found some awesome items. Old tin signs, a 50's coke bottle rack (that I plan on converting into shelves). Some really great stuff.
Also went with mom to pick out curtain material. Needed a ladies touch for this. We found some great green material for the curtains that I think is going to really match well.
So how does the TO-DO list look:
First the good news:
COMPLETED!!
Decals
Install Dimmer for exterior lights
Poly Floor..three coats
build drawer for under the bed
install all pulls and handles on cabinets
Install toilet and plumb
Plumb LP for hot water heater
STILL TO DO
Restore and recover dinette cushions.
New bumper
Build new wings
Mount wings
Make and install trim for all windows inside
Make curtains and mount rods
Shower curtain and head
Interior decore items
matress for the bunk
Run cable tv connection
Battery and Battery Box
Registration
Wednesday, September 28, 2011
So Whats Left
So its been a while since I last did my "To-Do" list. I have started feeling good about the state of the camper and my progress. So now is the time to look at all of the things that still need to be done and return to a state of depression and loathing over why I took on such a huge project in the first place. Let the tortuous lashings begin!
First the good news:
COMPLETED!!
- Fix the skin
- Mount skin
- Install all exterior items that will be painted.
- Wire and mount exterior lights
- Rebuild and polish windows
Prep skin for paint
Rebuild door
Paint
Make floor boards and install
Mount all windows
Install all running and brake lights
Install all handles and other exterior unpainted items
Mount new tires
Now the reality:
STILL TO DO
Decals
Restore and recover dinette cushions.
New bumper
Install Dimmer for exterior lights
Plumb LP for hot water heater
Poly Floor..three coats
Build new wings (damn you previous owner who removed them!)
Mount wings
Make and install trim for all windows inside
build drawer for under the be
install all pulls and handles on cabinets
Install toilet and plumb
Make curtains and mount rods
Shower curtain and head
Run Cable TV connection
Battery and Battery Box
REGISTER THE CAMPER!
Ok so I was wrong, that list actually had the opposite effect, that looks better than I thought. Well I think its safe to say that it will be ready for next season.... like the Redsox
First the good news:
COMPLETED!!
- Fix the skin
- Mount skin
- Install all exterior items that will be painted.
- Wire and mount exterior lights
- Rebuild and polish windows
Prep skin for paint
Rebuild door
Paint
Make floor boards and install
Mount all windows
Install all running and brake lights
Install all handles and other exterior unpainted items
Mount new tires
Now the reality:
STILL TO DO
Decals
Restore and recover dinette cushions.
New bumper
Install Dimmer for exterior lights
Plumb LP for hot water heater
Poly Floor..three coats
Build new wings (damn you previous owner who removed them!)
Mount wings
Make and install trim for all windows inside
build drawer for under the be
install all pulls and handles on cabinets
Install toilet and plumb
Make curtains and mount rods
Shower curtain and head
Run Cable TV connection
Battery and Battery Box
REGISTER THE CAMPER!
Ok so I was wrong, that list actually had the opposite effect, that looks better than I thought. Well I think its safe to say that it will be ready for next season.... like the Redsox
Tuesday, September 20, 2011
A New Floor
Here are some shots of the new floor. The dark wood is 2 1/4 wide Mahogany and the light is 3/4 wide birch. in order to keep the weight down all of the boards are ripped down and planed to 1/4 inch thick. Its glued and face nailed. These shots show it with no Poly. The hardest part was making the bull noses for the step up in the bathroom. But I have say I am very happy with the result. It kinda reminds me of a bowling ally... which I think works given that its a vintage camper.




Subscribe to:
Posts (Atom)