So its been a while since I last did my "To-Do" list. I have started feeling good about the state of the camper and my progress. So now is the time to look at all of the things that still need to be done and return to a state of depression and loathing over why I took on such a huge project in the first place. Let the tortuous lashings begin!
First the good news:
COMPLETED!!
- Fix the skin
- Mount skin
- Install all exterior items that will be painted.
- Wire and mount exterior lights
- Rebuild and polish windows
Prep skin for paint
Rebuild door
Paint
Make floor boards and install
Mount all windows
Install all running and brake lights
Install all handles and other exterior unpainted items
Mount new tires
Now the reality:
STILL TO DO
Decals
Restore and recover dinette cushions.
New bumper
Install Dimmer for exterior lights
Plumb LP for hot water heater
Poly Floor..three coats
Build new wings (damn you previous owner who removed them!)
Mount wings
Make and install trim for all windows inside
build drawer for under the be
install all pulls and handles on cabinets
Install toilet and plumb
Make curtains and mount rods
Shower curtain and head
Run Cable TV connection
Battery and Battery Box
REGISTER THE CAMPER!
Ok so I was wrong, that list actually had the opposite effect, that looks better than I thought. Well I think its safe to say that it will be ready for next season.... like the Redsox

Your Place for the Best Shasta Reproduction Wings Anywhere, and Shasta Restoration Knowledge!!!
Wednesday, September 28, 2011


Tuesday, September 20, 2011
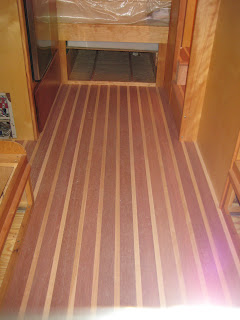
A New Floor
Here are some shots of the new floor. The dark wood is 2 1/4 wide Mahogany and the light is 3/4 wide birch. in order to keep the weight down all of the boards are ripped down and planed to 1/4 inch thick. Its glued and face nailed. These shots show it with no Poly. The hardest part was making the bull noses for the step up in the bathroom. But I have say I am very happy with the result. It kinda reminds me of a bowling ally... which I think works given that its a vintage camper.




Tuesday, September 6, 2011
The Shasta Gets Painted!
Well its a major milestone in any restoration. This past week I was able to get the Shasta painted. I decided on Colonial white for the top, and Sage green for the bottom. It was a long messy week of prepping, painting and assembling. Not to mention hurricane Irene decided to come by in the middle of the process.
I have added photos that show the full process from prime, to paint, to installing the lights and windows. We used self etching primer for any bare aluminum spots. The Z stripe was polished with steel wool and then clear coated prior to being masked. Then it was time for the Sage green on the bottom. This is Dupont automotive grade paint... if you are doing one of these and go the same route expect to spend a few bucks ($400 for the paint alone!) This green is as close as I could get to the 56 T-bird color I wanted. It was crazy trying to get the right match at the store.


I have added photos that show the full process from prime, to paint, to installing the lights and windows. We used self etching primer for any bare aluminum spots. The Z stripe was polished with steel wool and then clear coated prior to being masked. Then it was time for the Sage green on the bottom. This is Dupont automotive grade paint... if you are doing one of these and go the same route expect to spend a few bucks ($400 for the paint alone!) This green is as close as I could get to the 56 T-bird color I wanted. It was crazy trying to get the right match at the store.


You can see the greenish self etching primer on the roof

This method worked well... mask the stripe and use clear plastic to mask above the stripe. Once the green was dry we just rolled the plastic down to cover the green and spray the white. I used frog tape to mase the stripe, worked well and left a clean edge

I got a couple of runs in the green... cant see them here. the white came out perfect. Going to have to wet sand and buff out the runs I think


The white walls are actually Port-a-walls... look great. Just needs the baby moons


I put the badge back on it first... maybe it should have been the last thing I put on it but I just could not wait.

Windows back in and tanks on!


all polished windows and visors back in!

you can see the vents are in on the roof and the new water inlets and electrical portal are in.

New teardrop marker lights from VTS.. look great.

New Fan-tastic in the bunk

Fan-tastic in the rear too, new full size mattress and the skylight are in.

Enough said!
Thursday, August 11, 2011
The New Roof
Well it wasn't easy but I have to say it went very well. The new solid roof is on the Shasta. It is a far cry from the pin-hole filled flimsy panels that were on it before. This is a solid .040 thick sheet that is normally used on tractor trailers. Its a harder aluminum than the original which means its a bit more difficult to bend and form. But we finally got that.
The small panels were eliminated at the rear window so now there is only 1 seam at this point instead of 2. the union was made out of the end of one of these panels. This connects the new roof to the original lower rear panel and sealant keeps it leak tight.
Have a look:


The small panels were eliminated at the rear window so now there is only 1 seam at this point instead of 2. the union was made out of the end of one of these panels. This connects the new roof to the original lower rear panel and sealant keeps it leak tight.
Have a look:


Friday, August 5, 2011
The Color Results are In!
First of all thank you to those who placed there votes... it was an impressive turn-out, 11 different voters! Wow, serious numbers at the polls this year! Some interesting results:
WINNER: Polished/Turquoise... I am not too surprised by this, the turquoise is a classic color from the time period and the polished does look fantastic. My experiments with polishing the camper have had some mixed results but show that it is a huge amount of work. Not sure if the polish is going to happen.
2nd Place: Polished/Coral... I didn't see that coming at all. Not saying I don't like it, I do. It certainly stands out in a crowd and is definitely indicative of the period. I just never thought you guys would vote for that. I think the fact that this camper had the polished top may have helped the votes along.
Original colors White/Canary Yellow... only one vote. However I know who voted for it and like she said "its a very strong 1 vote" This was my cousin-in-law Julie. She is a vintage Airstream owner so she may have a bit more leverage than sayyyy someone who has mice living in their cars air filter. Not naming names, you know who you are!
Actually my personal pick scored rather low. I wont say what that is but I was surprised by that as well... I assume everyone should have the same taste as me.... NO?
Well thanks again, I will post an update after this weekends strenuous activities.
WINNER: Polished/Turquoise... I am not too surprised by this, the turquoise is a classic color from the time period and the polished does look fantastic. My experiments with polishing the camper have had some mixed results but show that it is a huge amount of work. Not sure if the polish is going to happen.
2nd Place: Polished/Coral... I didn't see that coming at all. Not saying I don't like it, I do. It certainly stands out in a crowd and is definitely indicative of the period. I just never thought you guys would vote for that. I think the fact that this camper had the polished top may have helped the votes along.
Original colors White/Canary Yellow... only one vote. However I know who voted for it and like she said "its a very strong 1 vote" This was my cousin-in-law Julie. She is a vintage Airstream owner so she may have a bit more leverage than sayyyy someone who has mice living in their cars air filter. Not naming names, you know who you are!
Actually my personal pick scored rather low. I wont say what that is but I was surprised by that as well... I assume everyone should have the same taste as me.... NO?
Well thanks again, I will post an update after this weekends strenuous activities.
Tuesday, August 2, 2011
The Reality
Well I have come to the conclusion that this project just isn't going to get done by Labor Day. I went ahead and cancelled my reservations. We had.... to say the least, a bad weekend working on the Shasta. Basically nothing got done. We worked all weekend trying to repair the roof panels which are full of dents and holes. After a day of scraping, bending, and sealing, I made the call that the roof is too roached to salvage. So this means I need to make a new roof for the camper.....grreeeeaaattttt. It's going to cost another $300 in aluminum and quite a bit of work. The good news is that the roof is going to be made of one solid sheet of aluminum with no seams. No seams means no leaks.
So a very disappointing weekend, but what can you do? There were a couple of things that were completed. The entry door has been broken down and is nearly rebuilt. Looks like I have been able to repair that. The wood in the door was so rotten there was nothing but nails left in some spots. A Shasta didn't use any sealant around the door panels and water can easily get in and sit in the hollow door. This won't happen with mine I can tell you that.
No new photos yet as there has not been much more to show. I will take some shots of the new roof as it progresses. Wish me luck. This MIGHT breath new life into the idea of polishing the camper. I did some tests this weekend and was not too pleased with the results. Stripping the paint went fine but getting a decent finish on the underlying aluminum wasn't easy. It would be quite a process and there is a ton of paint that would have to come off of this thing... so I think its unlikely that I will be polishing.
So a very disappointing weekend, but what can you do? There were a couple of things that were completed. The entry door has been broken down and is nearly rebuilt. Looks like I have been able to repair that. The wood in the door was so rotten there was nothing but nails left in some spots. A Shasta didn't use any sealant around the door panels and water can easily get in and sit in the hollow door. This won't happen with mine I can tell you that.
No new photos yet as there has not been much more to show. I will take some shots of the new roof as it progresses. Wish me luck. This MIGHT breath new life into the idea of polishing the camper. I did some tests this weekend and was not too pleased with the results. Stripping the paint went fine but getting a decent finish on the underlying aluminum wasn't easy. It would be quite a process and there is a ton of paint that would have to come off of this thing... so I think its unlikely that I will be polishing.
Thursday, July 28, 2011
Trying to Make the Deadline
Well the deadline of Labor Day weekend is looming. We have a family trip planned where there will be 4 other trailers/RV going to Vermont over the weekend. I made a reservation late last year as a goal to get the camper done for the trip... no doubt I am close. But close isn't going to cut it. The more I think about how much is left the more I know that it isn't going to happen. I would normally take a weeks vacation and work on it non stop, but with my work schedule and my wife's, its not panning out. So I am stuck with just working weekends. Its a bit depressing but What can you do?
We had a fairly productive weekend last week. The door side skin is on and the front skin is also complete. A few other odds and ends were buttoned up as well. Lets take a look at the task list, shall we?
COMPLETED!!!
- Wire a couple of exterior outlets
- Get new glass for all broken windows
STARTED
- Fix the skin (Just the Roof Left)
- Mount skin... again Roof, by far the hardest part.
- Install all exterior items that will be painted.
- Wire and mount exterior lights
- Restore and recover dinette cushions. (OH THE MOUSE PEE!)
- Rebuild and polish windows (1 LEFT!)
NOT YET STARTED
Plumb LP for hot water heater
Prep skin for paint (Test paint strippers and polishing!!!!)
Rebuild door
Paint
Make floor boards and install
Poly Floor..three coats
Mount new tires (rims are sandblasted)
Mount all windows
Build new wings (damn you previous owner who removed them!)
Mount wings
Make and install trim for all windows inside
Install toilet and plumb
Make curtains and mount rods
Battery and Battery Box
REGISTER THE CAMPER!
Uggs is all I can say..... If you read this list you know why 4 more weekends of work is not going to finish this camper.
We had a fairly productive weekend last week. The door side skin is on and the front skin is also complete. A few other odds and ends were buttoned up as well. Lets take a look at the task list, shall we?
COMPLETED!!!
- Wire a couple of exterior outlets
- Get new glass for all broken windows
STARTED
- Fix the skin (Just the Roof Left)
- Mount skin... again Roof, by far the hardest part.
- Install all exterior items that will be painted.
- Wire and mount exterior lights
- Restore and recover dinette cushions. (OH THE MOUSE PEE!)
- Rebuild and polish windows (1 LEFT!)
NOT YET STARTED
Plumb LP for hot water heater
Prep skin for paint (Test paint strippers and polishing!!!!)
Rebuild door
Paint
Make floor boards and install
Poly Floor..three coats
Mount new tires (rims are sandblasted)
Mount all windows
Build new wings (damn you previous owner who removed them!)
Mount wings
Make and install trim for all windows inside
Install toilet and plumb
Make curtains and mount rods
Battery and Battery Box
REGISTER THE CAMPER!
Uggs is all I can say..... If you read this list you know why 4 more weekends of work is not going to finish this camper.
Subscribe to:
Posts (Atom)